

Bạn cần kiểm thử logic điều hướng của ứng dụng trước khi xuất bản để xác minh rằng ứng dụng của bạn hoạt động như mong đợi.
Thành phần Điều hướng xử lý toàn bộ việc di chuyển giữa
các đích đến, truyền đối số và làm việc với
FragmentManager. Các chức năng này đã trải qua kiểm thử nghiêm ngặt nên bạn không cần phải kiểm thử lại trong ứng dụng. Tuy nhiên, yếu tố quan trọng cần kiểm thử là các tương tác giữa mã ứng dụng cụ thể trong các phân đoạn và NavController của các phân đoạn đó.
Kiểm thử riêng biệt
Để kiểm thử các tương tác của mảnh với NavController tương ứng một cách riêng biệt, Navigation 2.3 trở lên sẽ cung cấp TestNavHostController với các API để thiết lập đích đến hiện tại và xác minh ngăn xếp lui sau thao tác NavController.navigate().
Bạn có thể thêm cấu phần mềm Kiểm thử thao tác điều hướng (Navigation Testing) vào dự án bằng cách thêm
phần phụ thuộc sau vào tệp build.gradle của mô-đun ứng dụng:
Groovy
dependencies {
  def nav_version = "2.9.8"

  androidTestImplementation "androidx.navigation:navigation-testing:$nav_version"
}
Kotlin
dependencies {
  val nav_version = "2.9.8"

  androidTestImplementation("androidx.navigation:navigation-testing:$nav_version")
}
Hãy cân nhắc một trò chơi đố vui. Trò chơi bắt đầu bằng title_screen và chuyển đến màn hình in_game khi người dùng nhấp vào để chơi.
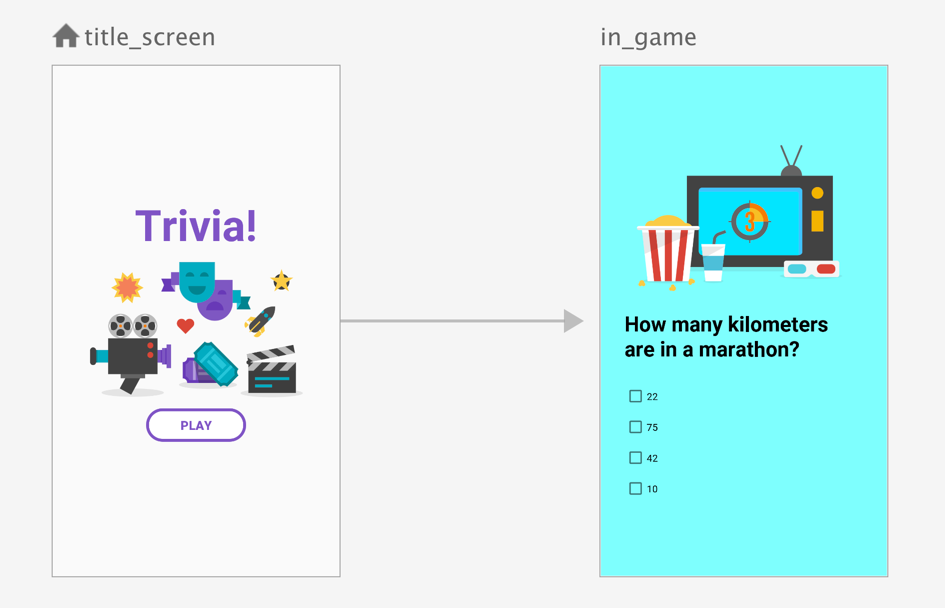
Phân đoạn biểu thị title_screen có thể sẽ có dạng như sau:
Kotlin
class TitleScreen : Fragment() {
    override fun onCreateView(
        inflater: LayoutInflater,
        container: ViewGroup?,
        savedInstanceState: Bundle?
    ) = inflater.inflate(R.layout.fragment_title_screen, container, false)

    override fun onViewCreated(view: View, savedInstanceState: Bundle?) {
        view.findViewById<Button>(R.id.play_btn).setOnClickListener {
            view.findNavController().navigate(R.id.action_title_screen_to_in_game)
        }
    }
}
Java
public class TitleScreen extends Fragment {

    @Nullable
    @Override
    public View onCreateView(@NonNull LayoutInflater inflater,
            @Nullable ViewGroup container, @Nullable Bundle savedInstanceState) {
        return inflater.inflate(R.layout.fragment_title_screen, container, false);
    }

    @Override
    public void onViewCreated(@NonNull View view, @Nullable Bundle savedInstanceState) {
        view.findViewById(R.id.play_btn).setOnClickListener(v -> {
            Navigation.findNavController(view).navigate(R.id.action_title_screen_to_in_game);
        });
    }
}
Để kiểm tra xem ứng dụng có chuyển hướng người dùng đến màn hình in_game đúng cách khi
người dùng nhấp vào Play (Chơi) hay không, quy trình kiểm thử của bạn cần xác minh rằng phân đoạn này
di chuyển NavController đến màn hình R.id.in_game đúng cách.
Bằng cách sử dụng kết hợp FragmentScenario, Espresso và TestNavHostController, bạn có thể tạo lại các điều kiện cần thiết để kiểm thử trường hợp này, như trong ví dụ sau:
Kotlin
@RunWith(AndroidJUnit4::class)
class TitleScreenTest {

    @Test
    fun testNavigationToInGameScreen() {
        // Create a TestNavHostController
        val navController = TestNavHostController(
            ApplicationProvider.getApplicationContext())

        // Create a graphical FragmentScenario for the TitleScreen
        val titleScenario = launchFragmentInContainer<TitleScreen>()

        titleScenario.onFragment { fragment ->
            // Set the graph on the TestNavHostController
            navController.setGraph(R.navigation.trivia)

            // Make the NavController available using the findNavController() APIs
            Navigation.setViewNavController(fragment.requireView(), navController)
        }

        // Verify that performing a click changes the NavController's state
        onView(ViewMatchers.withId(R.id.play_btn)).perform(ViewActions.click())
        assertThat(navController.currentDestination?.id).isEqualTo(R.id.in_game)
    }
}
Java
@RunWith(AndroidJUnit4::class)
public class TitleScreenTestJava {

    @Test
    fun testNavigationToInGameScreen() {

        // Create a TestNavHostController
        TestNavHostController navController = new TestNavHostController(
            ApplicationProvider.getApplicationContext());

        // Create a graphical FragmentScenario for the TitleScreen
        FragmentScenario<TitleScreen> titleScenario = FragmentScenario.launchInContainer(TitleScreen.class);

        titleScenario.onFragment(fragment ->
                // Set the graph on the TestNavHostController
                navController.setGraph(R.navigation.trivia);

                // Make the NavController available using the findNavController() APIs
                Navigation.setViewNavController(fragment.requireView(), navController)
        );

        // Verify that performing a click changes the NavController's state
        onView(ViewMatchers.withId(R.id.play_btn)).perform(ViewActions.click());
        assertThat(navController.currentDestination.id).isEqualTo(R.id.in_game);
    }
}
Ví dụ trước tạo một phiên bản của TestNavHostController và chỉ định phiên bản đó cho mảnh. Sau đó, ví dụ này sử dụng Espresso để điều khiển giao diện người dùng và xác minh rằng thao tác di chuyển
phù hợp đã được thực hiện.
Giống như NavController thực, bạn phải gọi setGraph để khởi chạy TestNavHostController. Trong ví dụ này, phân đoạn được kiểm thử là đích đến ban đầu của biểu đồ. TestNavHostController cung cấp phương thức setCurrentDestination cho phép bạn thiết lập đích đến hiện tại (và đối số cho đích đến đó nếu muốn) để NavController có trạng thái đúng trước khi bắt đầu kiểm thử.
Không giống như một thực thể NavHostController mà NavHostFragment sẽ sử dụng, TestNavHostController không kích hoạt hành vi navigate() cơ bản (chẳng hạn như FragmentTransaction mà FragmentNavigator thực hiện) khi bạn gọi navigate() – nó chỉ cập nhật trạng thái của TestNavHostController.
Kiểm thử NavigationUI bằng FragmentScenario
Trong ví dụ trước, lệnh gọi lại được cung cấp cho titleScenario.onFragment() sẽ được gọi sau khi phân đoạn này đã chuyển sang trạng thái RESUMED trong vòng đời. Tại thời điểm này, thành phần hiển thị của phân đoạn đã được tạo và gán. Do đó, thời điểm này trong vòng đời có lẽ đã quá muộn để kiểm thử đúng cách. Ví dụ: khi sử dụng NavigationUI cho các thành phần hiển thị trong phân đoạn (chẳng hạn như với Toolbar do phân đoạn kiểm soát), bạn có thể gọi phương thức thiết lập bằng NavController trước khi phân đoạn đạt đến trạng thái RESUMED. Do đó, bạn cần có cách để thiết lập
TestNavHostController tại thời điểm sớm hơn trong vòng đời.
Bạn có thể viết một phân đoạn có Toolbar riêng như sau:
Kotlin
class TitleScreen : Fragment(R.layout.fragment_title_screen) {
    override fun onViewCreated(view: View, savedInstanceState: Bundle?) {
        val navController = view.findNavController()
        view.findViewById<Toolbar>(R.id.toolbar).setupWithNavController(navController)
    }
}
Java
public class TitleScreen extends Fragment {
    public TitleScreen() {
        super(R.layout.fragment_title_screen);
    }

    @Override
    public void onViewCreated(@NonNull View view, @Nullable Bundle savedInstanceState) {
        NavController navController = Navigation.findNavController(view);
        view.findViewById(R.id.toolbar).setupWithNavController(navController);
    }
}
Ở đây, chúng ta cần tạo NavController trước thời điểm onViewCreated() được gọi. Cách sử dụng onFragment() như trước đó sẽ thiết lập TestNavHostController quá muộn trong vòng đời, khiến lệnh gọi findNavController() không thành công.
FragmentScenario cung cấp giao diện FragmentFactory. Bạn có thể sử dụng giao diện này để đăng ký các lệnh gọi lại cho các sự kiện trong vòng đời. Bạn có thể kết hợp với Fragment.getViewLifecycleOwnerLiveData() để nhận lệnh gọi lại ngay sau onCreateView(), như trong ví dụ sau:
Kotlin
val scenario = launchFragmentInContainer {
    TitleScreen().also { fragment ->

        // In addition to returning a new instance of our Fragment,
        // get a callback whenever the fragment's view is created
        // or destroyed so that we can set the NavController
        fragment.viewLifecycleOwnerLiveData.observeForever { viewLifecycleOwner ->
            if (viewLifecycleOwner != null) {
                // The fragment's view has just been created
                navController.setGraph(R.navigation.trivia)
                Navigation.setViewNavController(fragment.requireView(), navController)
            }
        }
    }
}
Java
FragmentScenario<TitleScreen> scenario =
FragmentScenario.launchInContainer(
       TitleScreen.class, null, new FragmentFactory() {
    @NonNull
    @Override
    public Fragment instantiate(@NonNull ClassLoader classLoader,
            @NonNull String className,
            @Nullable Bundle args) {
        TitleScreen titleScreen = new TitleScreen();

        // In addition to returning a new instance of our fragment,
        // get a callback whenever the fragment's view is created
        // or destroyed so that we can set the NavController
        titleScreen.getViewLifecycleOwnerLiveData().observeForever(new Observer<LifecycleOwner>() {
            @Override
            public void onChanged(LifecycleOwner viewLifecycleOwner) {

                // The fragment's view has just been created
                if (viewLifecycleOwner != null) {
                    navController.setGraph(R.navigation.trivia);
                    Navigation.setViewNavController(titleScreen.requireView(), navController);
                }

            }
        });
        return titleScreen;
    }
});
Khi sử dụng kỹ thuật này, NavController sẽ có mặt trước khi gọi onViewCreated(), cho phép phân đoạn sử dụng các phương thức NavigationUI mà không gặp sự cố.
Kiểm thử tính năng tương tác với các mục ngăn xếp lui
Khi tương tác với các mục ngăn xếp lui, TestNavHostController cho phép bạn kết nối bộ điều khiển với kiểm thử cho LifecycleOwner, ViewModelStore và OnBackPressedDispatcher bằng cách sử dụng các API kế thừa từ NavHostController.
Ví dụ: khi kiểm thử một phân đoạn sử dụng ViewModel có phạm vi điều hướng, bạn phải gọi setViewModelStore trên TestNavHostController:
Kotlin
val navController = TestNavHostController(ApplicationProvider.getApplicationContext())

// This allows fragments to use by navGraphViewModels()
navController.setViewModelStore(ViewModelStore())
Java
TestNavHostController navController = new TestNavHostController(ApplicationProvider.getApplicationContext());

// This allows fragments to use new ViewModelProvider() with a NavBackStackEntry
navController.setViewModelStore(new ViewModelStore())
Chủ đề có liên quan
- Tạo kiểm thử đơn vị đo lường – Tìm hiểu cách thiết lập bộ kiểm thử đo lường và chạy kiểm thử trên thiết bị chạy Android.
- Espresso – Kiểm thử giao diện người dùng của ứng dụng bằng Espresso.
- Quy tắc JUnit4 thông qua AndroidX Test – Sử dụng quy tắc JUnit 4 thông qua các thư viện AndroidX Test để linh hoạt hơn và giảm lượng mã nguyên mẫu cần có trong mã kiểm thử.
- Kiểm thử các phân đoạn của ứng dụng – Tìm hiểu cách kiểm thử các phân đoạn ứng dụng một cách riêng biệt bằng
FragmentScenario. - Thiết lập dự án cho AndroidX Test – Tìm hiểu cách khai báo các thư viện cần thiết trong tệp dự án của ứng dụng để sử dụng AndroidX Test.