
Android 스튜디오는 design-time 기능(예: 프래그먼트에 표시되는 레이아웃) 또는 compile-time 동작(예: XML 리소스에 적용되는 축소 모드)을 사용 설정하는 다양한 XML 속성을 tools 네임스페이스에서 지원합니다. 앱을 빌드할 때 빌드 도구는 이러한 속성을 삭제하므로 APK 크기 또는 런타임 동작에 영향을 미치지 않습니다.
이러한 속성을 사용하려면 아래와 같이 속성을 사용할 각 XML 파일의 루트 요소에 tools 네임스페이스를 추가합니다.
<RootTag xmlns:android="http://schemas.android.com/apk/res/android"
    xmlns:tools="http://schemas.android.com/tools" >
오류 처리 속성
다음 속성을 사용하면 린트 경고 메시지를 숨길 수 있습니다.
tools:targetApi
사용 대상: 모든 요소
사용 주체: 린트
이 속성은 Java 코드의 @TargetApi 주석과 동일하게 작동합니다. 이 속성을 사용하면 이 요소를 지원하는 API 수준을 정수 또는 코드명으로 지정할 수 있습니다.
이 속성은 이 요소와 모든 하위 요소가 특정 API 수준 이상에서만 사용된다고 도구에 알립니다. 이 속성을 사용하면 minSdkVersion으로 지정한 API 수준에서 관련 요소 또는 요소의 속성을 사용할 수 없는 경우에 발생하는 린트 경고가 중단됩니다.
예를 들어 GridLayout은 API 수준 14 이상에서만 사용할 수 있고 그보다 하위 버전의 코드에서는 사용되지 않는 것을 알고 있으므로 이 속성을 사용할 수도 있습니다.
<GridLayout xmlns:android="http://schemas.android.com/apk/res/android"
    xmlns:tools="http://schemas.android.com/tools"
    tools:targetApi="14" >
(하지만 지원 라이브러리의 GridLayout을 사용하는 것이 좋습니다.)
디자인-시간 뷰 속성
다음 속성은 Android 스튜디오 레이아웃 미리보기에서만 보이는 레이아웃 특성을 정의합니다.
android: 대신 tools:
사용 대상: <View>
사용 주체: Android 스튜디오 Layout Editor
Android 프레임워크에서 모든 <View> 속성을 android: 대신 tools: 접두어와 함께 사용하여 레이아웃 미리보기에 샘플 데이터를 삽입할 수 있습니다.
이 속성은 속성값이 런타임까지 채워지지 않지만 레이아웃 미리보기에서 미리 효과를 보고 싶을 때 유용합니다.
예를 들어, android:text 속성값이 런타임에 설정되었거나 기본값과 다른 값을 사용하는 레이아웃을 보려면 tools:text를 추가하여 레이아웃 미리보기 전용으로 일부 텍스트를 지정하면 됩니다.
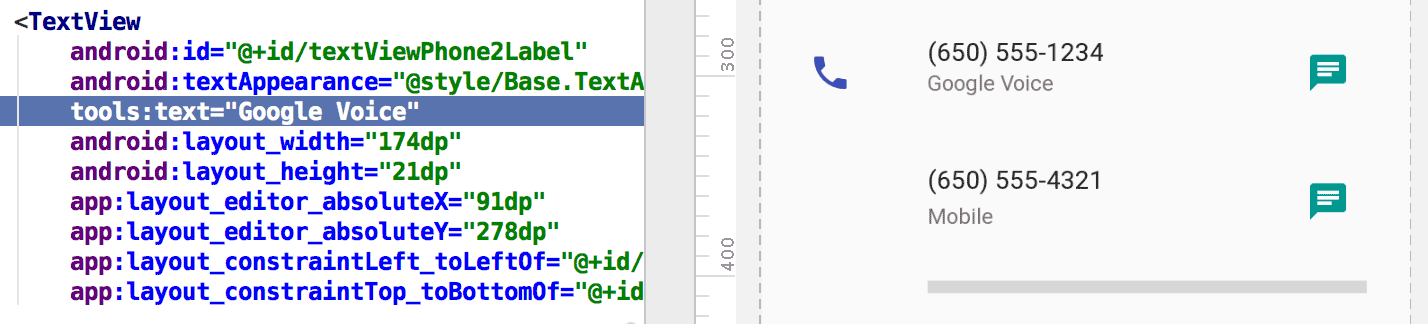
tools:text 속성이 레이아웃 미리보기 값으로 'Google Voice'를 설정함런타임에 사용되는 android: 네임스페이스 속성과 그에 일치하되 레이아웃 미리보기에서만 런타임 속성을 재정의할 수 있는 tools: 속성을 모두 추가할 수 있습니다.
tools: 속성을 사용하여 레이아웃 미리보기 전용 속성 설정을 실행취소할 수도 있습니다. 예를 들어, 두 개의 하위 요소를 가진 FrameLayout이 있지만 레이아웃 미리보기에서 하나의 하위 요소만 보고 싶은 경우 아래와 같이 레이아웃 미리보기에서 두 하위 요소 중 하나를 보이지 않도록 설정할 수 있습니다.
<Button
    android:id="@+id/button"
    android:layout_width="wrap_content"
    android:layout_height="wrap_content"
    android:text="First" />

<Button
    android:id="@+id/button2"
    android:layout_width="wrap_content"
    android:layout_height="wrap_content"
    android:text="Second"
    tools:visibility="invisible"  />
디자인 보기에서 Layout Editor를 사용할 때 Properties 창에서 일부 design-time 뷰 속성을 수정할 수 있습니다. 각 design-time 속성은 같은 이름을 가진 실제 속성과 구별하기 위해 속성 이름 옆에 렌치 아이콘  이 표시됩니다.
tools:context
사용 대상: 모든 루트 <View>
사용 주체: 린트, Android 스튜디오 Layout Editor
이 속성은 레이아웃과 기본으로 연결된 활동을 선언합니다. 이렇게 하면 그림 2와 같이 편집기나 레이아웃 미리보기에서 활동에 관한 지식이 필요한 기능(예: 미리보기의 레이아웃 테마 및 빠른 수정 메뉴에서 생성된 onClick 핸들러를 삽입할 위치)을 사용할 수 있습니다.
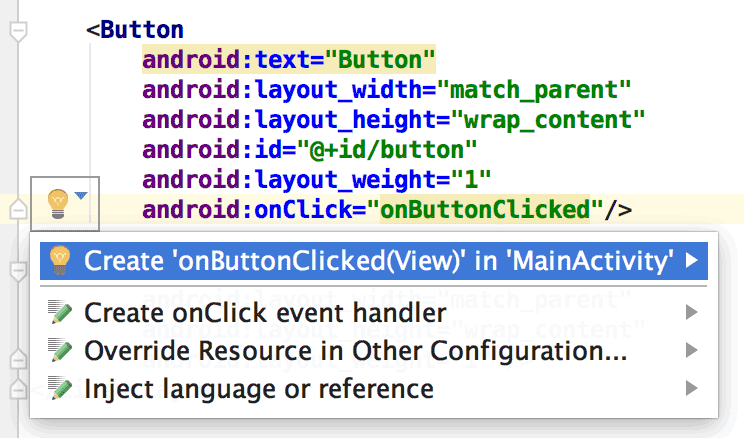
tools:context를 설정한 경우에만 작동하는 onClick 속성의 빠른 수정 메뉴활동 클래스 이름은 매니페스트 파일과 동일하게 점 접두어를 사용하여 지정할 수 있습니다(전체 패키지 이름 제외).
예:
<android.support.constraint.ConstraintLayout
    xmlns:android="http://schemas.android.com/apk/res/android"
    xmlns:tools="http://schemas.android.com/tools"
    tools:context=".MainActivity" >
tools:itemCount
사용 대상: <RecyclerView>
사용 주체: Android 스튜디오 Layout Editor
이 속성은 Layout Editor가 특정 RecyclerView에 대해 Preview 창에 렌더링해야 하는 항목 수를 지정합니다.
예를 들면 다음과 같습니다.
<androidx.recyclerview.widget.RecyclerView
    android:id="@+id/recyclerView"
    android:layout_width="match_parent"
    android:layout_height="match_parent"
    tools:itemCount="3"/>
tools:layout
사용 대상: <fragment>
사용 주체: Android 스튜디오 Layout Editor
레이아웃 미리보기에서는 일반적으로 레이아웃을 적용하는 활동 코드를 실행할 수 없기 때문에 이 속성은 레이아웃 미리보기에서 프래그먼트 안에 그리려고 하는 레이아웃을 선언합니다.
예:
<fragment android:name="com.example.main.ItemListFragment"
    tools:layout="@layout/list_content" />
tools:listitem, tools:listheader, tools:listfooter
사용 대상: <AdapterView>(<ListView>와 같은 서브클래스 포함)
사용 주체: Android 스튜디오 Layout Editor
이 속성은 목록의 항목, 헤더 및 바닥글을 위해 레이아웃 미리보기에 보여줄 레이아웃을 지정합니다. 목록의 항목이 반복되지 않도록 레이아웃의 모든 데이터 필드는 숫자 콘텐츠(예: Item 1)로 채워집니다.
예:
<ListView xmlns:android="http://schemas.android.com/apk/res/android"
    xmlns:tools="http://schemas.android.com/tools"
    android:id="@android:id/list"
    android:layout_width="match_parent"
    android:layout_height="match_parent"
    tools:listitem="@layout/sample_list_item"
    tools:listheader="@layout/sample_list_header"
    tools:listfooter="@layout/sample_list_footer" />
tools:showIn
사용 대상: <include>에 의해 참조되는 레이아웃의 모든 루트 <View>
사용 주체: Android 스튜디오 Layout Editor
이 속성을 사용하면 <include>를 사용하여 이 레이아웃을 사용하는 레이아웃을 가리킬 수 있으므로 상위 요소 레이아웃에 삽입되어 있는 동안 이 파일이 표시되면 미리 보고 수정할 수 있습니다.
예:
<TextView xmlns:android="http://schemas.android.com/apk/res/android"
    xmlns:tools="http://schemas.android.com/tools"
    android:text="@string/hello_world"
    android:layout_width="wrap_content"
    android:layout_height="wrap_content"
    tools:showIn="@layout/activity_main" />
이제 레이아웃 미리보기에서는 TextView 레이아웃이 activity_main 레이아웃 안에 표시됩니다.
tools:menu
사용 대상: 모든 루트 <View>
사용 주체: Android 스튜디오 Layout Editor
이 속성은 레이아웃 미리보기에서 앱 바에 표시할 메뉴를 지정합니다. 속성값은 하나 이상의 메뉴 ID이며 @menu/ 또는 이런 종류의 ID 접두어 및 .xml 확장자 없이 쉼표로 구분됩니다.
예:
<?xml version="1.0" encoding="utf-8"?>
<LinearLayout xmlns:android="http://schemas.android.com/apk/res/android"
    xmlns:tools="http://schemas.android.com/tools"
    android:orientation="vertical"
    android:layout_width="match_parent"
    android:layout_height="match_parent"
    tools:menu="menu1,menu2" />
tools:minValue, tools:maxValue
사용 대상: <NumberPicker>
사용 주체: Android 스튜디오 Layout Editor
이 속성은 NumberPicker 뷰의 최솟값과 최댓값을 설정합니다.
예를 들면 다음과 같습니다.
<NumberPicker xmlns:android="http://schemas.android.com/apk/res/android"
    xmlns:tools="http://schemas.android.com/tools"
    android:id="@+id/numberPicker"
    android:layout_width="match_parent"
    android:layout_height="wrap_content"
    tools:minValue="0"
    tools:maxValue="10" />
tools:openDrawer
사용 대상: <DrawerLayout>
사용 주체: Android 스튜디오 Layout Editor
이 속성을 사용하여 미리보기에서 DrawerLayout을 열 수 있습니다.
다음 값 중 하나를 전달하여 Layout Editor에서 레이아웃을 렌더링하는 방법을 수정할 수도 있습니다.
표 1. Layout Editor에서 DrawerLayout을 렌더링하는 방식을 수정하는 값
| 상수 | 값 | 설명 |
|---|---|---|
end | 800005 | 객체 크기를 변경하지 않고 객체를 컨테이너 끝으로 푸시합니다. |
left | 3 | 객체 크기를 변경하지 않고 객체를 컨테이너 왼쪽으로 푸시합니다. |
right | 5 | 객체 크기를 변경하지 않고 객체를 컨테이너 오른쪽으로 푸시합니다. |
start | 800003 | 객체 크기를 변경하지 않고 객체를 컨테이너 맨 앞으로 푸시합니다. |
예:
<androidx.drawerlayout.widget.DrawerLayout
    xmlns:android="http://schemas.android.com/apk/res/android"
    xmlns:tools="http://schemas.android.com/tools"
    android:id="@+id/drawer_layout"
    android:layout_width="match_parent"
    android:layout_height="match_parent"
    tools:openDrawer="start" />
"@tools:sample/*" 리소스
사용 대상: UI 텍스트 또는 이미지를 지원하는 모든 뷰
사용 주체: Android 스튜디오 Layout Editor
이 속성을 사용하면 자리표시자 데이터 또는 이미지를 뷰에 삽입할 수 있습니다. 예를 들어 앱의 UI 텍스트를 결정하기 전에 레이아웃이 텍스트와 함께 어떻게 작동하는지 테스트하려면 다음과 같이 자리표시자 텍스트를 사용하면 됩니다.
<TextView xmlns:android="http://schemas.android.com/apk/res/android"
    xmlns:tools="http://schemas.android.com/tools"
    android:layout_width="wrap_content"
    android:layout_height="wrap_content"
    tools:text="@tools:sample/lorem" />
아래 표는 레이아웃에 삽입할 수 있는 자리표시자 데이터의 유형을 설명합니다.
표 2. 레이아웃용 자리표시자 데이터
| 속성값 | 자리표시자 데이터 설명 |
|---|---|
@tools:sample/full_names |
@tools:sample/first_names와 @tools:sample/last_names의 조합으로 무작위 생성된 전체 이름 |
@tools:sample/first_names |
일반 이름 |
@tools:sample/last_names |
일반 성 |
@tools:sample/cities |
전 세계 도시 이름 |
@tools:sample/us_zipcodes |
무작위로 생성된 미국 우편번호 |
@tools:sample/us_phones |
(800) 555-xxxx 형식으로 무작위 생성된 전화번호 |
@tools:sample/lorem |
라틴어로 된 자리표시자 텍스트 |
@tools:sample/date/day_of_week |
특정 형식을 위해 무작위로 지정된 날짜 및 시간 |
@tools:sample/date/ddmmyy | |
@tools:sample/date/mmddyy | |
@tools:sample/date/hhmm | |
@tools:sample/date/hhmmss | |
@tools:sample/avatars |
프로필 아바타로 사용할 수 있는 벡터 드로어블 |
@tools:sample/backgrounds/scenic |
배경으로 사용할 수 있는 이미지 |