
If you have an existing XR project in Godot, you can add support for Android XR without starting a new, separate project. Some steps are required for all projects, while others are optional depending on the XR features that your project uses. Throughout the steps, we've included links to multiple open-source Godot XR projects that have added support for Android XR, along with relevant pull requests that showcase the changes that are required to enable certain features.
Required steps for all projects
Complete the steps in the following topics no matter what types of XR features your project supports. Afterwards, review the features outlined in the list of optional steps to determine whether your project requires additional work.
Update Godot and the Godot OpenXR Vendors Plugin
Follow these steps to update your project to the latest required versions and configure your project's settings for Android XR:
- Update your Godot version to 4.6.2 or higher. See the documentation on migrating to a new version if you need additional help for your project.
Download Godot OpenXR Vendors Plugin version 5.1 or higher from the Asset Store, Asset Library or the repository on GitHub.
Configure your project's settings for Android XR:
- Add an export preset for Android XR.
- Enable Use Gradle Build.

- In the XR Features section, select OpenXR for the XR Mode, and select Enable AndroidXR Plugin.

Add support for hand tracking
While controllers might be available, the primary input method on Android XR headsets and XR glasses is hand tracking. If possible, you should add hand tracking support to your Godot project.
Add support for hand tracking: Configure project settings
First, follow these steps to set up your project settings to enable hand tracking and its related OpenXR extensions.
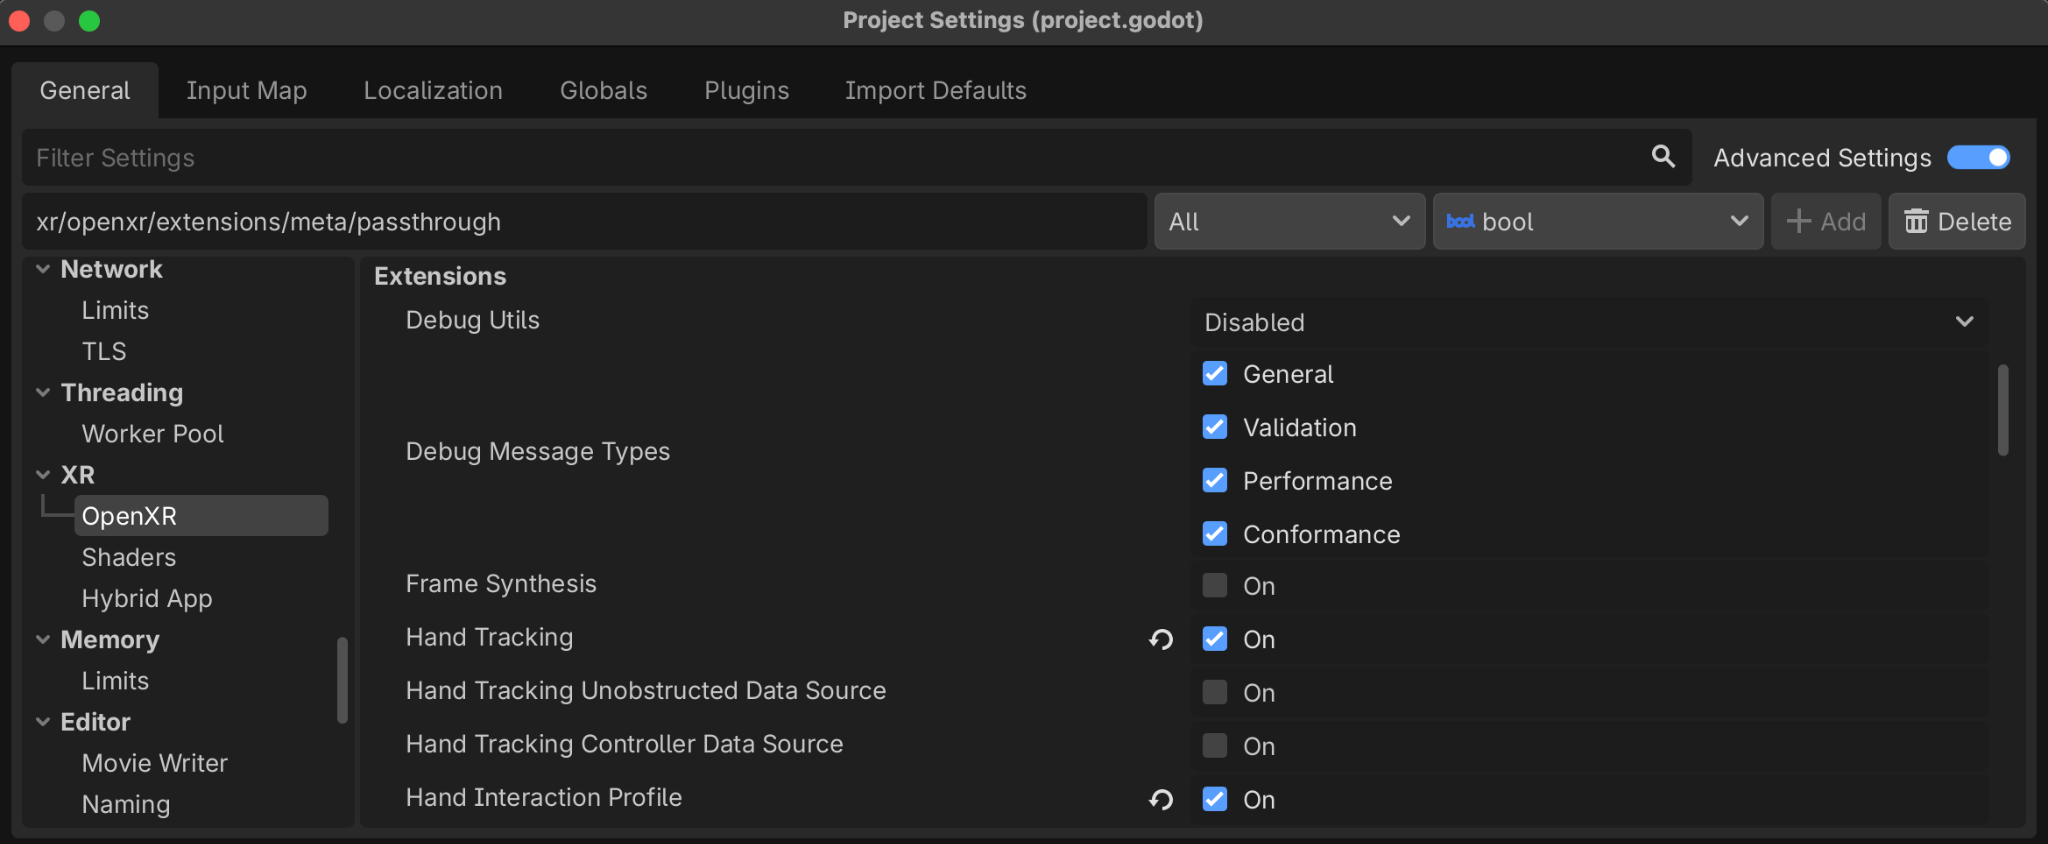
- Open your project's settings and navigate to the General > XR > OpenXR.
In the Extensions section, select Hand Tracking and Hand Interaction Profile.
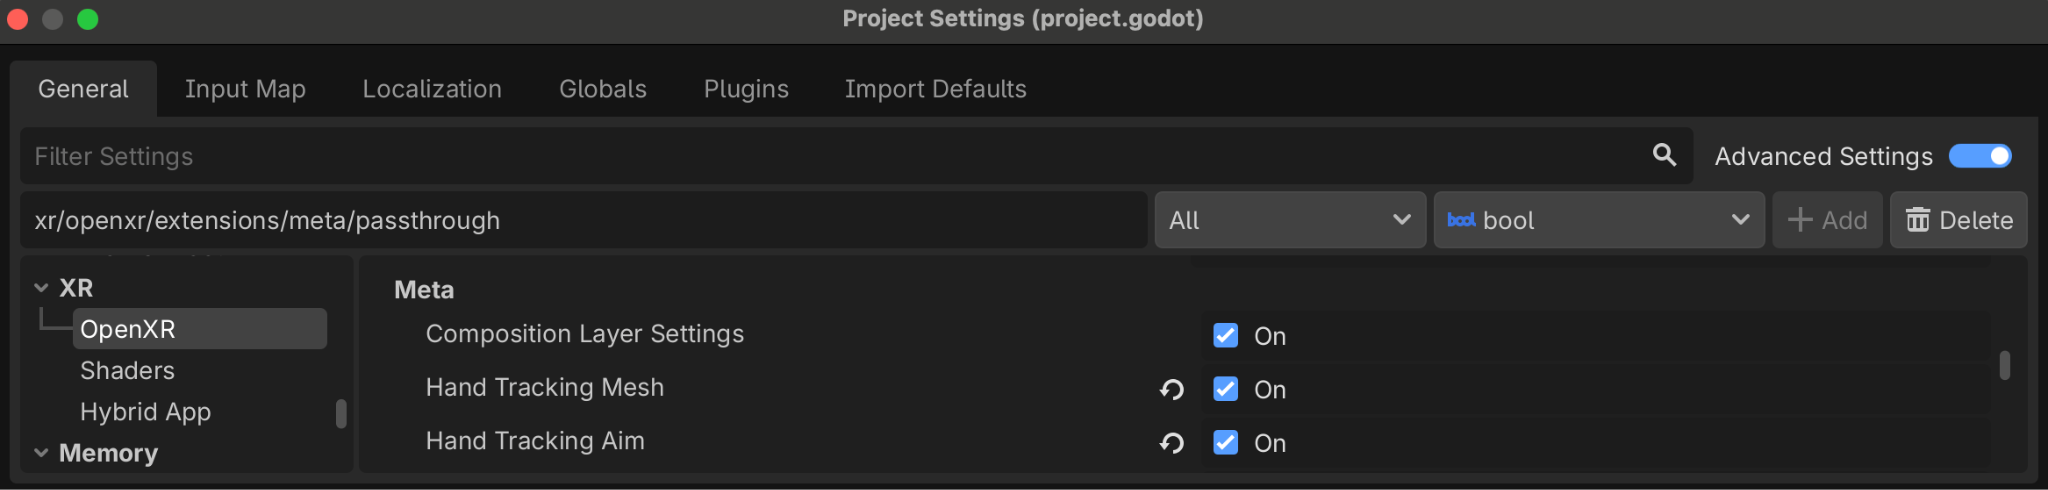
Find the Meta subsection in the Extensions section, and select Hand Tracking Mesh and Hand Tracking Aim.
Add support for hand tracking: Add and configure controller nodes
Rather than dynamically modifying the existing XRController3D nodes for hand
tracking, add controller nodes for tracking and displaying the hand models, as
well as handling input from the Hand Tracking Aim extension:
Add three additional
XRController3Dnodes to yourXROrigin3Dnode.- Name one "HandTrackingLeft", and set the tracker property to
/user/hand_tracker/left. - Name another "HandTrackingRight", and set the tracker property to
/user/hand_tracker/right. - Name the last "HandTrackingAimLeft", and set the tracker property to
/user/fbhandaim/left.
If your project's original
XRController3Dnodes were named "XRController3D_left" and "XRController3D_right", your scene would look something like this:
- Name one "HandTrackingLeft", and set the tracker property to
Connect the signal
tracking_changedon HandTrackingLeft and HandTrackingRight to individual functions that update the visibility of the corresponding controller trackers (XRController3D_left and XRController3D_right in the preceding example).For example, the function connected to the signal on HandTrackingLeft could look like:
func _on_hand_tracking_left_hand_tracking_changed(tracking):
    $XROrigin3D/XRController3D_left.visible = not tracking
Enable the Show When Tracked property on the hand tracking controller nodes.
Now your project can visually swap between controller models and hand tracking models, depending on if the user is using hand tracking or controllers.
Add some
OpenXRFbHandTrackingMeshnodes as children to your hand tracking controller nodes.Add
XRHandModifier3Dnodes as children to theseOpenXRFbHandTrackingMeshnodes, ensuring the correct Hand Tracker property is set, to apply real time hand tracking data to the models.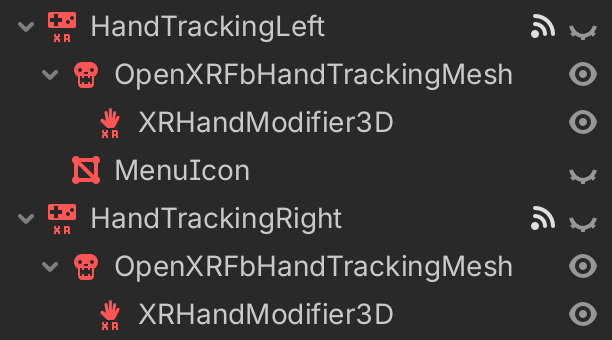
Add support for hand tracking: Set up a Hand Interaction profile on the OpenXR Action Map
Next, you'll set up the Hand Interaction profile on the OpenXR Action Map:
- Open the OpenXR Action Map menu at the bottom of the editor.
- Delete the Simple Controller profile to avoid compatibility issues with Galaxy XR controllers.
- Click Add Profile, select Hand Interaction, and then click OK.
Map this profile to one or more action sets however you like.
Depending on your app's requirements, you might also want to adjust how your app handles user input with hand tracking.
Add support for hand tracking: Set up a menu gesture for Android XR
Lastly, you can implement a menu gesture for Android XR. This shows an icon when the player's left hand is in the correct position to perform the menu gesture, as well as showing or hiding the menu when the user performs the gesture. You'll use the HandTrackingAimLeft node that you added earlier to handle this.
Add a billboarded quad to the left hand tracking node displaying an icon that you've chosen (see the MenuIcon node in the following image from the controller nodes you added earlier).
Connect to the
button_pressedandbutton_releasedsignals on HandTrackingAimLeft to functions like this one:@onready var menu_icon: MeshInstance3D = $XROrigin3D/HandTrackingLeft/MenuIcon func _on_hand_tracking_aim_left_button_pressed(p_name): if p_name == "menu_pressed": toggle_menu() elif p_name == "menu_gesture": if OS.has_feature("androidxr"): menu_icon.visible = true func _on_hand_tracking_aim_left_button_released(p_name): if p_name == "menu_gesture": menu_icon.visible = false
Optional steps for certain features
After completing the required steps for your project, you decide whether you need to do additional work for certain features, depending on your app's requirements and capabilities. For more information about each of these optional features, see the following sections.
Register pinches as button presses
In Android XR, pinching is used for many foundational system actions, such as selecting items, scrolling, moving or resizing windows, and moving UI elements or objects in 2D and 3D space. To align with these patterns and promote a consistent user experience, your app should register pinches similarly to button presses on a controller when using hand tracking.
To configure your app this way, use the float values that are provided by the Hand Interaction profile that you created to create a virtual action:
const PRESSED_THRESHOLD := 0.8
const RELEASED_THRESHOLD := 0.6

@onready var left_controller: XRController3D = $XROrigin/XRController3D_left

func _on_xr_controller_3d_left_input_float_changed(p_name: String, value: float):
    if p_name == "pinch":
        var xr_tracker = XRServer.get_tracker(left_controller.tracker)
        if _left_hand_pinching:
            if value < RELEASED_THRESHOLD:
                _left_hand_pinching = false
                xr_tracker.set_input("pinch_pressed", false)
        else:
            if value > PRESSED_THRESHOLD:
                _left_hand_pinching = true
                xr_tracker.set_input("pinch_pressed", true)
Key points about the code
- Checks if the
floatvalue is greater than or less than specific thresholds in theXRController3Dinput_float_changedsignals. - Creates a virtual action called
pinch_pressed.
Use XR Tools functions together with hand tracking
Many Godot XR projects utilize Godot XR Tools, including some
of the open-source projects that are linked in this page. For some XR Tools
functions to work, such as FunctionPointer for menu interactions, you'll need
some additional code to swap the action it's looking for when the user switches
to hand tracking.
For example, when using FunctionPointer for menu interactions, update the
active_button_action property to the hand-tracking action based on the
tracking_changed signal of the XRController3D nodes for hand tracking (these
nodes were HandTrackingLeft and HandTrackingRight in the preceding hand
tracking setup steps).
const TRIGGER_POINTER_ACTION = "trigger_click"
const PINCH_POINTER_ACTION = "pinch_pressed"

@onready var func_point_left: XRToolsFunctionPointer = %FunctionPointerLeft

func _on_hand_tracking_left_tracking_changed(tracking: bool) -> void:
    if tracking:
        func_point_left.active_button_action = PINCH_POINTER_ACTION
else:
func_point_left.active_button_action = TRIGGER_POINTER_ACTION
Key points about the code
- This code relies on a
pinch_pressedvirtual action that you can create to register pinches as button presses.
Use hand tracking together with artificial locomotion
If your project uses artificial locomotion, hand tracking support is still possible. For example, you can build a movement system that lets players draw paths to traverse with a gesture, or you can allow players to pump their hands up and down to accelerate, with additional gestures for jumping, climbing, and gliding.
The Museum of All Things, has artificial locomotion using the thumbsticks on the controllers. Hand tracking locomotion was implemented by adding "virtual thumbsticks" that the player triggers by pinching in the air, and moving their hand in the direction that they want that thumbstick to move.
Here are some of the key takeways from the pull request that implemented this support:
- An
XRVirtualThumbstickscene is instantiated when pinch is detected. - While the pinch is held, the relative distance and direction from the
original pinch location is turned to a
Vector2and mapped virtually to the normal thumbstick input. - Visual feedback of this input is also given to the player in the form of two billboarded quad meshes, illustrating the thumbstick position.
You can try a similar approach to get your existing thumbstick-driven locomotion code to work with minimal changes. However, your project might still require a custom locomotion solution for hand tracking.
Add passthrough support
You can add passthrough support to your app so that your users can see their real-world surroundings.
To do this for your app, make the following code changes:
- Set the
environment_blend_modeof the OpenXRXRInterfacetoXR_ENV_BLEND_MODE_ALPHA_BLEND. - Set the
background_modeof theWorldEnvironmentnode toBG_COLOR. - Set the
background_colorof theWorldEnvironmentnode to any color that is fully transparent. - Set the
Viewport transparent_bgproperty totrue.
Use the light estimation extension
When enabling passthrough, consider using the Android XR Light Estimation OpenXR
extension. This extension tweaks properties of the WorldEnvironment and
DirectionalLight3D to better emulate the lighting of a user's real world
environment, so virtual objects blend in better with the real-world lighting
conditions. You can enable this extension in your project's settings.
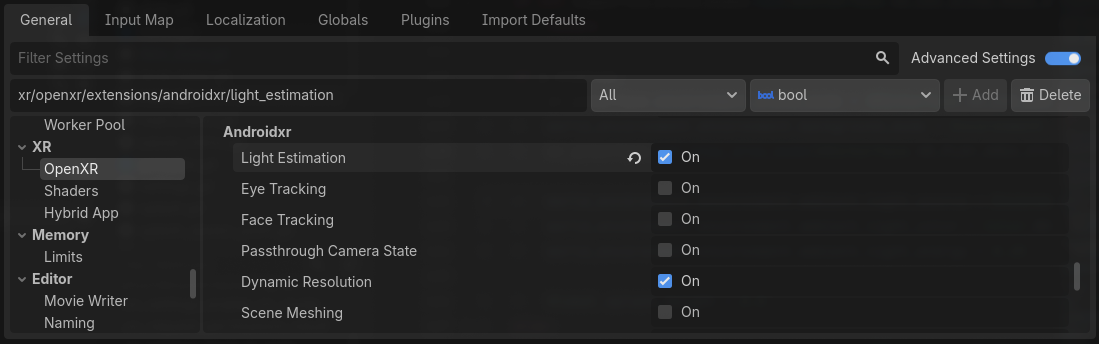
- Open your project's settings and navigate to the General > XR > OpenXR.
In the Androidxr section, select Light Estimation.
Add an
OpenXRAndroidLightEstimationnode to your scene tree and connect it to your scene'sWorldEnvironmentandDirectionalLight3D.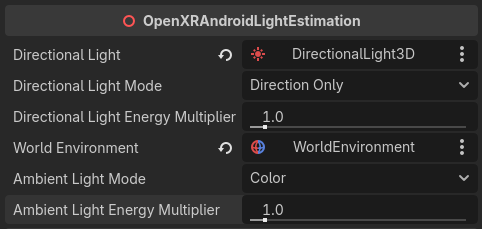
Example: Enable or disable passthrough and light estimation
The following code enables or disables passthrough and light estimation:
@onready var world_environment = $WorldEnvironment
@onready var directional_light = $DirectionalLight3D
@onready var directional_light_orig_transform: Transform3D = directional_light.transform

func set_passthrough_enabled(p_enabled: bool) -> void:
    var xr_interface = XRServer.find_interface("OpenXR")
    if xr_interface == null:
        return

    var supported_blend_modes = xr_interface.get_supported_environment_blend_modes()
    if not supported_blend_modes.has(XRInterface.XR_ENV_BLEND_MODE_ALPHA_BLEND):
        return

    # Passthrough
    if p_enabled:
        xr_interface.set_play_area_mode(XRInterface.XR_PLAY_AREA_STAGE)
        xr_interface.environment_blend_mode = XRInterface.XR_ENV_BLEND_MODE_ALPHA_BLEND
        world_environment.environment.background_mode = Environment.BG_COLOR
        world_environment.environment.background_color = Color(0.0, 0.0, 0.0, 0.0)
        get_viewport().transparent_bg = true
    else:
        xr_interface.set_play_area_mode(XRInterface.XR_PLAY_AREA_ROOMSCALE)
        xr_interface.environment_blend_mode = XRInterface.XR_ENV_BLEND_MODE_OPAQUE
        world_environment.environment.background_mode = Environment.BG_SKY
        get_viewport().transparent_bg = false

    # Light Estimation
    if OS.has_feature("androidxr"):
        var light_estimation = Engine.get_singleton("OpenXRAndroidLightEstimationExtension")
        if p_enabled and light_estimation.is_light_estimation_supported():
            light_estimation.start_light_estimation()
        elif light_estimation.is_light_estimation_started():
            light_estimation.stop_light_estimation()
            directional_light.transform = directional_light_orig_transform
Key points about the code
- When disabling light estimation, the original direction of the
DirectionalLight3Dmust be restored manually. - For a full example of a project using passthrough and Light Estimation, check out Expedition to Blobotopia on GitLab.